

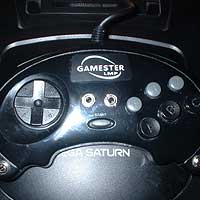
D.I.Y. Sega Saturn Switch Interface
This guide explains how to create a limited switch interface for Sega Saturn games machines. The basic theory for adapting Saturn controllers here would also follow for many other games machines.
Sega Saturns are similar in power to Sony Playstation's, although they are not so common, with a much smaller library of games. However, they have an excellent built in music CD player where you can use left and right to alter the pitch of your music.
If you're an absolute beginner, we strongly recommend that you follow "The Basic Soldering Guide" - by Alan Winstanley. Then have a look at the "How Stuff Works" explanation of game controllers.
SAFETY: Adapting equipment voids the manufacturer's guarantee, and the attempt may cause irreparable damage. Always use adapted equipment under supervision, and disconnect any batteries when not in use. These adaptations are at your own risk. Good luck!
Almost all of the following components are commonly available from Electronics stores such as Maplin Electronics. Sega Saturns are available very cheaply second hand (around £15), from places such as eBay.
1. What you will need:

- 1x Sega Saturn controller ('Gamester' third party controller used here).
- 4x 3.5mm mono sockets, more if you wish.
- Soldering iron (15 to 30 Watt power); thin solder; soldering flux; desoldering braid; thin wire (e.g 7strand 0.2mm).
- Cordless drill with 2 drill bits (1x 1/4"; 1x 2mm); knife or wire strippers; small screwdriver set.
2. Make 4 holes:
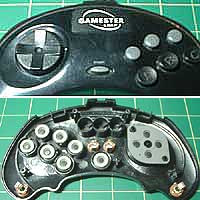
Unscrew the casing. Carefully remove the PCB (see lower part of picture).
Drill 4 x 1/4" holes in the casing for your 3.5mm sockets. Ensure that there will be room to put everything back together again.
3. Test your sockets
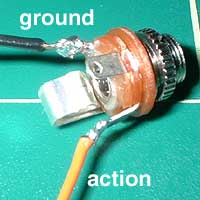
As not all sockets are connected alike, you will need to find which 2 of the 3 contacts you need to solder to.
Attach a test lamp or multimeter to any 2 contacts. Plug in your switch, then press it. If the lamp comes on when pressed you have the right connections, otherwise try a different combination. There's only 3 possibilities.
4. Ground Loom

Connect a ground loom. Leave a trailing wire from both ends to connect to a ground point on the controller's PCB.
Ensure that you make a continuous connection through all the sockets - using the SAME connector for each socket.
N.B.I recommend using the left most solder point of each socket (as pictured).
5. Solder sockets to PCB


Solder the trailing wires of your ground loom to a ground point on the PCB (circled yellow in picture opposite - click to enlarge).
Use the pictured key to get an idea of how your controller's PCB is set out. To test - hook up your Saturn and touch a short wire from a ground point to one of the contact points (circled red).
When you decide which functions to take to your switch sockets (e.g. Left, Right, A, B), drill a hole at the appropriate point (example circled red opposite). Solder a length of wire from this point to the appropriate socket.
N.B.Make sure that your soldering doesn't spill across the tracks, shorting out the function. Use electrical tape on the PCB if you think your sockets might touch it.
6. Reassemble
When you have connected all your sockets, and tested them. Carefully reassemble the casing, making sure that you are not trapping any wires.
7. Full Test

Use the inbuilt audio CD player to test all the functions of the joypad.
Test that the joypad functions as normal, then use a switch to check all four sockets.
8. Trouble Shooting

Any problems - disconnect, and restudy the quality of your soldering. Is there any loose solder on the board? Have you soldered the switch permanently on by accident? Use the soldering iron and soldering braid to remove, then resolder any poor joints.
If you are getting nothing at all from the controller, you may have cooked the ROM chip. It's a desperate measure - but try putting the entire controller in your freezer for a few minutes.
D.I.Y. Text and images PUBLIC DOMAIN 2004 - www.OneSwitch.org.uk
Sega Saturn adaptation PUBLIC DOMAIN - 2004 - Barrie Ellis